/bin/rm: Argument list too long.
root@mx /var/virusmails # ls
razor-agent.log
spam-3398a20c9a59797df9b57fbe34feeace-20040519-084342-19051-05.gz
spam-57e230b6d1dca0dadf83d858d0b10788-20040519-084400-19144-03.gz
spam-6f3be6d2304f90e418db23443916101a-20040519-082357-18227-10.gz
virus-20040419-091017-12544-01
virus-20040419-130621-14993-07
virus-20040421-120113-57877-07
virus-20040421-165651-61698-07
virus-20040423-020850-90966-03
virus-20040423-090733-97665-04
virus-20040427-211030-99133-07
virus-20040427-225312-01622-01
virus-20040428-190241-18845-05
virus-20040505-103654-59956-10
root@mx /var/virusmails # rm spam-*
/bin/rm: Argument list too long.
How many files was I dealing with here?
root@mx /var/virusmails # ls -1 | grep virus | wc -l
1667
This is not a limitation of the rm command, but a kernel limitation on the size of the parameters of the command. Since I was performing shell globbing (selecting all the files with extension .wrk), this meant that the size of the command line arguments became bigger with the number of the files involved. For who cares this is defined by:
egrep ARG_MAX /usr/include/linux/limits.h
#define ARG_MAX 131072 /* # bytes of args + environ for exec() */
Solution is to remove file through following find command
root@mx /var/virusmails # find . -name 'spam-*' | xargs rm
it works like a charm.
Thursday, June 16, 2011
Wednesday, June 15, 2011
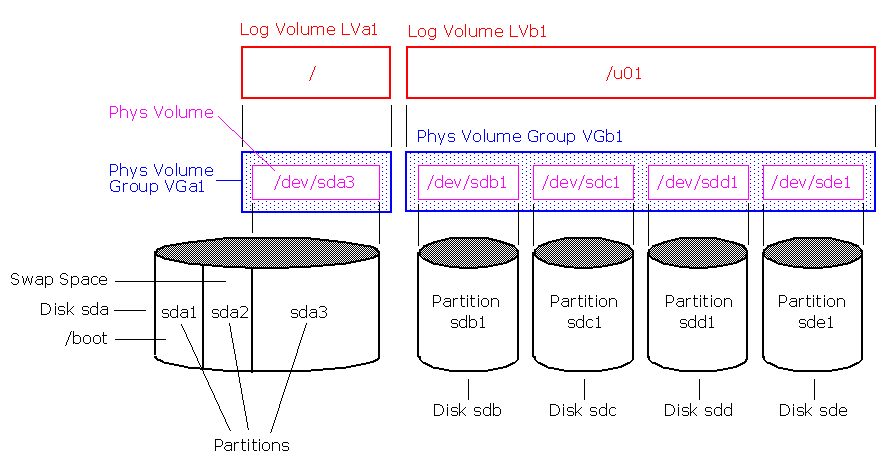
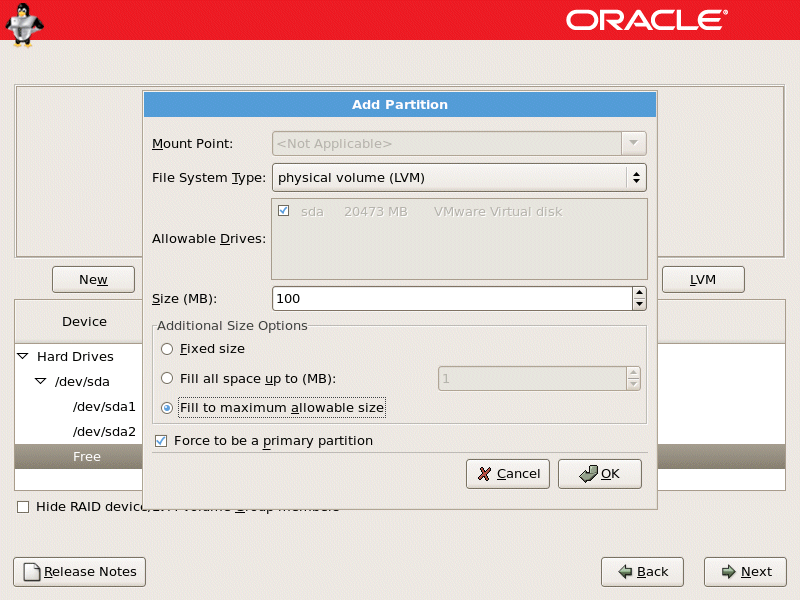
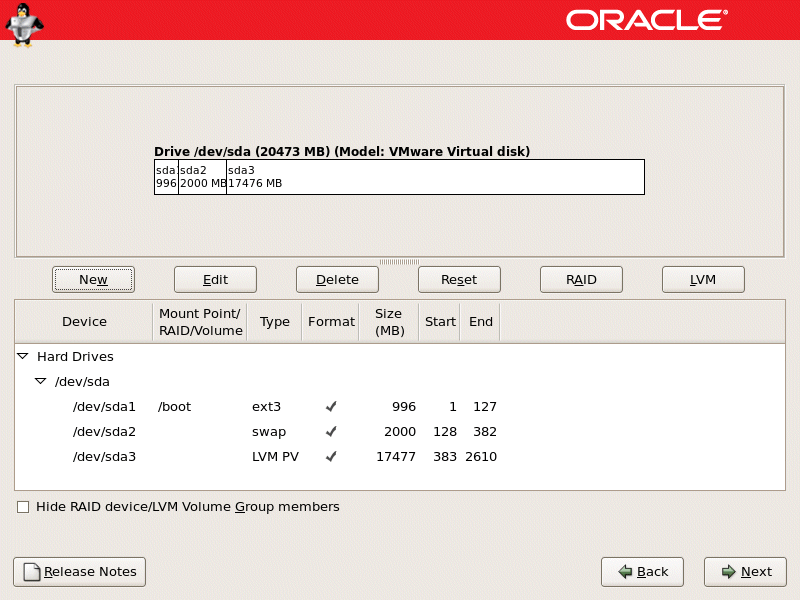
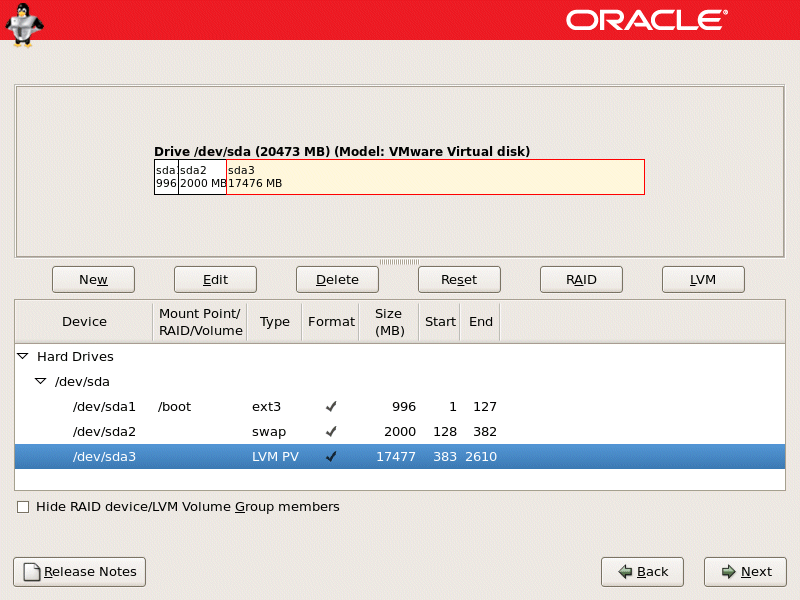
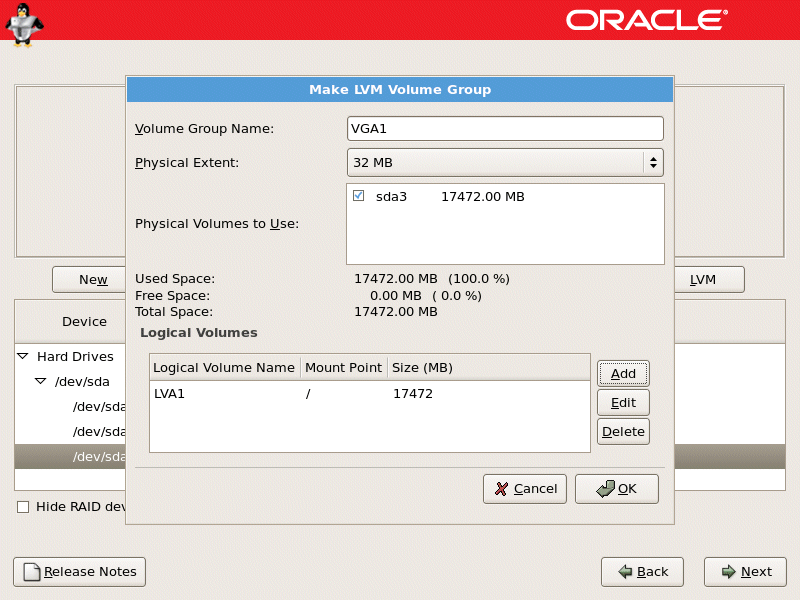
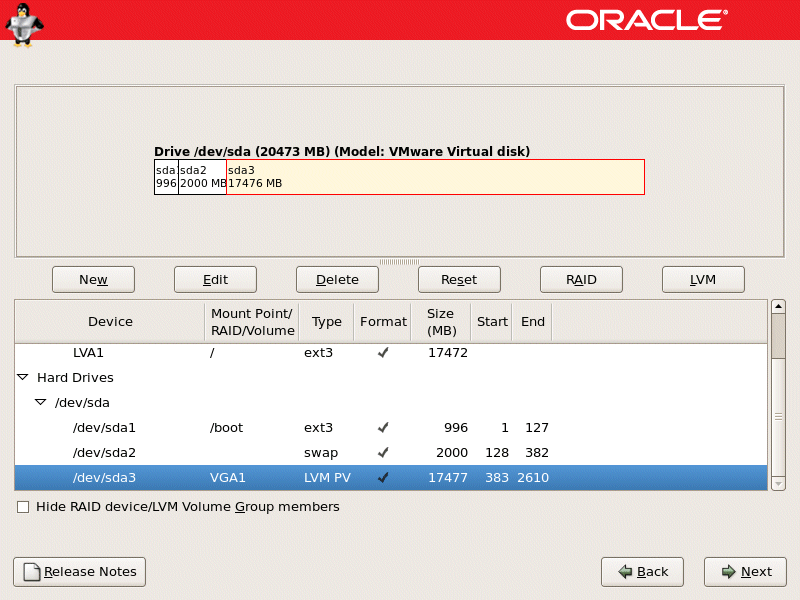
LVM

Monday, June 13, 2011
TOP Descriptions
PID - process ID of the process
USER - User who is running the process
PR - The priority of the process
NI - Nice value of the process (higher value indicates lower priority)
VIRT - The total amount of virtual memory used
RES - Resident task size
SHR - Amount of shared memory used
S - State of the task. Values are S (sleeping), D (uninterruptible sleep), R (running), Z (zombies), or T (stopped or traced)
%CPU - Percentage of CPU used
%MEM - Percentage of Memory used
TIME+ - Total CPU time used
COMMAND - Command issued
Interacting with TOP
Now that we are able to understand the output from TOP lets learn how to change the way the output is displayed.
Just press the following key while running top and the output will be sorted in real time.
M - Sort by memory usage
P - Sort by CPU usage
T - Sort by cumulative time
z - Color display
k - Kill a process
q - quit
If we want to kill the process with PID 3161, then press “k” and a prompt will ask you for the PID number, and enter 3161.
Command Line Parameters with TOP
You can control what top displays by issuing parameters when you run top.
- d - Controls the delay between refreshes
- p - Specify the process by PID that you want to monitor
-n - Update the display this number of times and then exit
If we want to only monitor the http process with a PID of 3166
$ top -p 3166
If we want to change the delay between refreshes to 5 seconds
$ top -d 5
Monday, June 6, 2011
NIS Linux
======================================
Configure NIS Linux:
======================================
| portmap | The foundation RPC daemon upon which NIS runs. |
| yppasswdd | Lets users change their passwords on the NIS server from NIS clients |
| ypserv | Main NIS server daemon |
| ypbind | Main NIS client daemon |
| ypxfrd | Used to speed up the transfer of very large NIS maps |
You need to add the NIS domain you wish to use in the /etc/sysconfig/network file.
For the school, call the domain NIS-SCHOOL-NETWORK and Install ypserv rpm.
#/etc/sysconfig/network
NISDOMAIN="NIS-SCHOOL-NETWORK"
NIS servers also have to be NIS clients themselves, so you'll have to edit the NIS
client configuration file /etc/yp.conf to list the domain's NIS server as being the
server itself or localhost.
# /etc/yp.conf - ypbind configuration file
ypserver 127.0.0.1
Start the necessary NIS daemons in the /etc/init.d directory and use the chkconfig
command to ensure they start after the next reboot.
[root@bigboy tmp]# service portmap start
Starting portmapper: [ OK ]
[root@bigboy tmp]# service yppasswdd start
Starting YP passwd service: [ OK ]
[root@bigboy tmp]# service ypserv start
Setting NIS domain name NIS-SCHOOL-NETWORK: [ OK ]
Starting YP server services: [ OK ]
[root@bigboy tmp]#
[root@bigboy tmp]# chkconfig portmap on
[root@bigboy tmp]# chkconfig yppasswdd on
[root@bigboy tmp]# chkconfig ypserv on
Table 30-1 Required NIS Server Daemons
Daemon
portmap The foundation RPC daemon upon which NIS runs.
yppasswdd Lets users change their passwords on the NIS server from NIS clients
ypserv Main NIS server daemon
ypbind Main NIS client daemon
ypxfrd Used to speed up the transfer of very large NIS maps
Make sure they are all running before continuing to the next step. You can use the
rpcinfo command to do this.
[root@bigboy tmp]# rpcinfo -p localhost
program vers proto port
100000 2 tcp 111 portmapper
100000 2 udp 111 portmapper
100009 1 udp 681 yppasswdd
100004 2 udp 698 ypserv
100004 1 udp 698 ypserv
100004 2 tcp 701 ypserv
100004 1 tcp 701 ypserv
[root@bigboy tmp]#
Now that you have decided on the name of the NIS domain, you'll have to use the
ypinit command to create the associated authentication files for the domain. You
will be prompted for the name of the NIS server, which in this case is bigboy.
With this procedure, all non privileged accounts are automatically accessible via
NIS.
[root@bigboy tmp]# /usr/lib/yp/ypinit -m
At this point, we have to construct a list of the hosts which will run NIS
servers. bigboy is in the list of NIS server hosts. Please continue to add
the names for the other hosts, one per line. When you are done with the
list, type a.
next host to add: bigboy
next host to add:
The current list of NIS servers looks like this:
bigboy
Is this correct? [y/n: y] y
We need a few minutes to build the databases...
Building /var/yp/NIS-SCHOOL-NETWORK/ypservers...
Running /var/yp/Makefile...
gmake[1]: Entering directory `/var/yp/NIS-SCHOOL-NETWORK'
Updating passwd.byname...
Updating passwd.byuid...
Updating group.byname...
Updating group.bygid...
Updating hosts.byname...
Updating hosts.byaddr...
Updating rpc.byname...
Updating rpc.bynumber...
Updating services.byname...
Updating services.byservicename...
Updating netid.byname...
Updating protocols.bynumber...
Updating protocols.byname...
Updating mail.aliases...
gmake[1]: Leaving directory `/var/yp/NIS-SCHOOL-NETWORK'
bigboy has been set up as a NIS master server.
Now you can run ypinit -s bigboy on all slave server.
[root@bigboy tmp]#
Note: Make sure portmap is running before trying this step or you'll get errors, such
as:
failed to send 'clear' to local ypserv: RPC: Port mapper failureUpdating
group.bygid...
You will have to delete the /var/yp/NIS-SCHOOL-NETWORK directory and restart portmap,
yppasswd, and ypserv before you'll be able to do this again successfully.
You can now start the ypbind and the ypxfrd daemons because the NIS domain files have
been created.
[root@bigboy tmp]# service ypbind start
Binding to the NIS domain: [ OK ]
Listening for an NIS domain server.
[root@bigboy tmp]# service ypxfrd start
Starting YP map server: [ OK ]
[root@bigboy tmp]# chkconfig ypbind on
[root@bigboy tmp]# chkconfig ypxfrd on
All the NIS daemons use RPC port mapping and, therefore, are listed using the rpcinfo
command when they are running correctly.
[root@bigboy tmp]# rpcinfo -p localhost
program vers proto port
100000 2 tcp 111 portmapper
100000 2 udp 111 portmapper
100003 2 udp 2049 nfs
100003 3 udp 2049 nfs
100021 1 udp 1024 nlockmgr
100021 3 udp 1024 nlockmgr
100021 4 udp 1024 nlockmgr
100004 2 udp 784 ypserv
100004 1 udp 784 ypserv
100004 2 tcp 787 ypserv
100004 1 tcp 787 ypserv
100009 1 udp 798 yppasswdd
600100069 1 udp 850 fypxfrd
600100069 1 tcp 852 fypxfrd
100007 2 udp 924 ypbind
100007 1 udp 924 ypbind
100007 2 tcp 927 ypbind
100007 1 tcp 927 ypbind
[root@bigboy tmp]#
New NIS users can be created by logging into the NIS server and creating the new user
account. In this case, you'll create a user account called nisuser and give it a
new password.
Once this is complete, you then have to update the NIS domain's authentication files
by executing the make command in the /var/yp directory.
This procedure makes all NIS-enabled, nonprivileged accounts become automatically
accessible via NIS, not just newly created ones. It also exports all the user's
characteristics stored in the /etc/passwd and /etc/group files, such as the login
shell, the user's group, and home directory.
[root@bigboy tmp]# useradd -g users nisuser
[root@bigboy tmp]# passwd nisuser
Changing password for user nisuser.
New password:
Retype new password:
passwd: all authentication tokens updated successfully.
[root@bigboy tmp]# cd /var/yp
[root@bigboy yp]# make
gmake[1]: Entering directory `/var/yp/NIS-SCHOOL-NETWORK'
Updating passwd.byname...
Updating passwd.byuid...
Updating netid.byname...
gmake[1]: Leaving directory `/var/yp/NIS-SCHOOL-NETWORK'
[root@bigboy yp]#
You can check to see if the user's authentication information has been updated by
using the ypmatch command, which should return the user's encrypted password
string.
[root@bigboy yp]# ypmatch nisuser passwd
nisuser:$1$d6E2i79Q$wp3Eo0Qw9nFD/::504:100::/home/nisuser:/bin/bash
[root@bigboy yp]
You can also use the getent command, which has similar syntax. Unlike ypmatch, getent
doesn't provide an encrypted password when run on an NIS server, it just provides
the user's entry in the /etc/passwd file. On a NIS client, the results are
identical with both showing the encrypted password.
[root@bigboy yp]# getent passwd nisuser
nisuser:x:504:100::/home/nisuser:/bin/bash
[root@bigboy yp]#
Now that the NIS server is configured, it's time to configure the NIS clients. There
are a number of related configuration files that you need to edit to get it to
work. Take a look at the procedure.
The authconfig or the authconfig-tui program automatically configures your NIS files
after prompting you for the IP address and domain of the NIS server.
[root@smallfry tmp]# authconfig-tui
Once finished, it should create an /etc/yp.conf file that defines, amongst other
things, the IP address of the NIS server for a particular domain. It also edits the
/etc/sysconfig/network file to define the NIS domain to which the NIS client
belongs.
# /etc/yp.conf - ypbind configuration file
domain NIS-SCHOOL-NETWORK server 192.168.1.100
#/etc/sysconfig/network
NISDOMAIN=NIS-SCHOOL-NETWORK
In addition, the authconfig program updates the /etc/nsswitch.conf file that lists
the order in which certain data sources should be searched for name lookups, such
as those in DNS, LDAP, and NIS. Here you can see where NIS entries were added for
the important login files.
#/etc/nsswitch.conf
passwd: files nis
shadow: files nis
group: files nis
Note: You can also locate a sample NIS nsswitch.conf file in the
/usr/share/doc/yp-tools* directory.
Start the ypbind NIS client, and portmap daemons in the /etc/init.d directory and use
the chkconfig command to ensure they start after the next reboot. Remember to use
the rpcinfo command to ensure they are running correctly.
[root@smallfry tmp]# service portmap start
Starting portmapper: [ OK ]
[root@smallfry tmp]# service ypbind start
Binding to the NIS domain:
Listening for an NIS domain server.
[root@smallfry tmp]#
[root@smallfry tmp]# chkconfig ypbind on
[root@smallfry tmp]# chkconfig portmap on
Note: Remember to use the rpcinfo -p localhost command to make sure they all started
correctly.
As the configuration examples refer to the NIS client and server by their hostnames,
you'll have to make sure the names resolve correctly to IP addresses. This can be
configured either in DNS, when the hosts reside in the same domain, or more simply
by editing the /etc/hosts file on both Linux boxes.
#
# File: /etc/hosts (smallfry)
#
192.168.1.100 bigboy
#
# File: /etc/hosts (bigboy)
#
192.168.1.102 smallfry
You can run the ypcat, ypmatch, and getent commands to make sure communication to the
server is correct.
[root@smallfry tmp]# ypcat passwd
nisuser:$1$Cs2GMe6r$1hohkyG7ALrDLjH1:505:100::/home/nisuser:/bin/bash
quotauser:!!:503:100::/home/quotauser:/bin/bash
ftpinstall:$1$8WjAVtes$SnRh9S1w07sYkFNJwpRKa.:502:100::/:/bin/bash
www:$1$DDCi/OPI$hwiTQ.L0XqYJUk09Bw.pJ/:504:100::/home/www:/bin/bash
smallfry:$1$qHni9dnR$iKDs7gfyt..BS9Lry3DAq.:501:100::/:/bin/bash
[root@smallfry tmp]#
[root@smallfry tmp]# ypmatch nisuser passwd
nisuser:$1$d6E2i79Q$wp3Eo0Qw9nFD/:504:100::/home/nisuser:/bin/bash
[root@smallfry tmp]#
[root@smallfry tmp]# getent passwd nisuser
nisuser:$1$d6E2i79Q$wp3Eo0Qw9nFD/:504:100::/home/nisuser:/bin/bash
[root@smallfry tmp]#
Once your basic NIS functionality testing is complete, try to test a remote login.
Failures in this area could be due to firewalls blocking TELNET or SSH access and
the TELNET and SSH server process not being started on the clients.
Logging In Via Telnet
Try logging into the NIS client via telnet if it is enabled
[root@bigboy tmp]# telnet 192.168.1.201
Trying 192.168.1.201...
Connected to 192.168.1.201.
Escape character is '^]'.
Red Hat Linux release 9 (Shrike)
Kernel 2.4.20-6 on an i686
login: nisuser
Password:
Last login: Sun Nov 16 22:03:51 from 192-168-1-100.simiya.com
[nisuser@smallfry nisuser]$
Logging In Via SSH
Try logging into the NIS client via SSH.
[root@bigboy tmp]# ssh -l nisuser 192.168.1.102
nisuser@192.168.1.102
[nisuser@smallfry nisuser]$
In some versions of Linux, the NIS client's SSH daemon doesn't re-read the
/etc/nsswitch.conf file you just modified until SSH is restarted. SSH logins,
therefore, won't query the NIS server until this is done. Restart SSH on the NIS
client.
[root@smallfry root]# service sshd restart
Stopping sshd:[ OK ]
Starting sshd:[ OK ]
[root@smallfry root]#
IP Addressing
| Class | 1st Octet Decimal Range | 1st Octet High Order Bits | Network/Host ID (N=Network, H=Host) | Default Subnet Mask | Number of Networks | Hosts per Network (Usable Addresses) |
|---|---|---|---|---|---|---|
| A | 1 – 126* | 0 | N.H.H.H | 255.0.0.0 | 126 (27 – 2) | 16,777,214 (224 – 2) |
| B | 128 – 191 | 10 | N.N.H.H | 255.255.0.0 | 16,382 (214 – 2) | 65,534 (216 – 2) |
| C | 192 – 223 | 110 | N.N.N.H | 255.255.255.0 | 2,097,150 (221 – 2) | 254 (28 – 2) |
| D | 224 – 239 | 1110 | Reserved for Multicasting | |||
| E | 240 – 254 | 1111 | Experimental; used for research | |||
Note: Class A addresses 127.0.0.0 to 127.255.255.255 cannot be used and is reserved for loopback and diagnostic functions.
Private IP Addresses
| Class | Private Networks | Subnet Mask | Address Range |
|---|---|---|---|
| A | 10.0.0.0 | 255.0.0.0 | 10.0.0.0 - 10.255.255.255 |
| B | 172.16.0.0 - 172.31.0.0 | 255.240.0.0 | 172.16.0.0 - 172.31.255.255 |
| C | 192.168.0.0 | 255.255.0.0 | 192.168.0.0 - 192.168.255.255 |
======================================
NETMASK:
======================================
Net bits Subnet mask total-addresses
/20 255.255.240.0 4096
/21 255.255.248.0 2048
/22 255.255.252.0 1024
/23 255.255.254.0 512
/24 255.255.255.0 256
/25 255.255.255.128 128
/26 255.255.255.192 64
/27 255.255.255.224 32
/28 255.255.255.240 16
/29 255.255.255.248 8
/30 255.255.255.252 4
Netmask Netmask (binary) CIDR Notes
255.255.255.255 11111111.11111111.11111111.11111111 /32 Host (single addr)
255.255.255.254 11111111.11111111.11111111.11111110 /31 Unuseable
255.255.255.252 11111111.11111111.11111111.11111100 /30 2 useable
255.255.255.248 11111111.11111111.11111111.11111000 /29 6 useable
255.255.255.240 11111111.11111111.11111111.11110000 /28 14 useable
255.255.255.224 11111111.11111111.11111111.11100000 /27 30 useable
255.255.255.192 11111111.11111111.11111111.11000000 /26 62 useable
255.255.255.128 11111111.11111111.11111111.10000000 /25 126 useable
255.255.255.0 11111111.11111111.11111111.00000000 /24 "Class C" 254 useable
255.255.254.0 11111111.11111111.11111110.00000000 /23 2 Class C's
255.255.252.0 11111111.11111111.11111100.00000000 /22 4 Class C's
255.255.248.0 11111111.11111111.11111000.00000000 /21 8 Class C's
255.255.240.0 11111111.11111111.11110000.00000000 /20 16 Class C's
255.255.224.0 11111111.11111111.11100000.00000000 /19 32 Class C's
255.255.192.0 11111111.11111111.11000000.00000000 /18 64 Class C's
255.255.128.0 11111111.11111111.10000000.00000000 /17 128 Class C's
255.255.0.0 11111111.11111111.00000000.00000000 /16 "Class B"
255.254.0.0 11111111.11111110.00000000.00000000 /15 2 Class B's
255.252.0.0 11111111.11111100.00000000.00000000 /14 4 Class B's
255.248.0.0 11111111.11111000.00000000.00000000 /13 8 Class B's
255.240.0.0 11111111.11110000.00000000.00000000 /12 16 Class B's
255.224.0.0 11111111.11100000.00000000.00000000 /11 32 Class B's
255.192.0.0 11111111.11000000.00000000.00000000 /10 64 Class B's
255.128.0.0 11111111.10000000.00000000.00000000 /9 128 Class B's
255.0.0.0 11111111.00000000.00000000.00000000 /8 "Class A"
254.0.0.0 11111110.00000000.00000000.00000000 /7
252.0.0.0 11111100.00000000.00000000.00000000 /6
248.0.0.0 11111000.00000000.00000000.00000000 /5
240.0.0.0 11110000.00000000.00000000.00000000 /4
224.0.0.0 11100000.00000000.00000000.00000000 /3
192.0.0.0 11000000.00000000.00000000.00000000 /2
128.0.0.0 10000000.00000000.00000000.00000000 /1
0.0.0.0 00000000.00000000.00000000.00000000 /0 IP space
Subscribe to:
Posts (Atom)